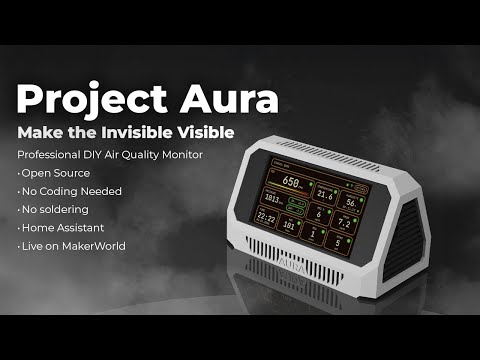
Project Aura is an open-source ESP32-S3 air-quality station built for makers who want a polished, reliable device rather than a bare sensor board. It combines a touch-friendly LVGL UI, a full local web dashboard with browser OTA updates, a Wi-Fi setup portal, optional 0-10V fan control, and MQTT with Home Assistant discovery.
This repository contains the firmware source code and configuration needed to flash and customize the device.
Support the project: back the crowdfunding to get detailed build instructions, 3D-printable enclosure models, and wiring guides at https://makerworld.com/en/crowdfunding/159-project-aura-make-the-invisible-visible
Join the community: GitHub Discussions
- What it is: a finished air-quality monitor (touchscreen + web dashboard + Home Assistant), not a bare sensor breakout.
- Minimum BOM: ESP32-S3-Touch-LCD-4.3 + Sensirion SEN66 + 5V power. Everything else is optional.
- Skill level: solder-free assembly using Grove/QT cables, but the connector pin order is custom — read the wiring notice.
- Software: PlatformIO + Arduino-ESP32 3.1.1; flash firmware and LittleFS image (web/UI assets), then onboard Wi-Fi.
- Works without internet: AP setup mode and the local dashboard are fully offline.
- Videos
- Highlights
- Gallery
- UI Screens
- Web Dashboard
- Hardware and BOM
- Assembly and Wiring Notice
- Pin Configuration
- UI Languages
- Firmware Architecture
- Build and Flash
- Configuration
- MQTT + Home Assistant
- Network Requirements
- Contributing
- License and Commercial Use
- Tests
- Repo Layout
- AI Assistance
Watch the demo:
Also watch the hands-on review: Project Aura review on YouTube
Telemetry
- Particulate: PM0.5 / PM1 / PM2.5 / PM4 / PM10
- Gases: CO, CO2, VOC, NOx, HCHO, plus one optional electrochemical gas (NH3, SO2, NO2, H2S, or O3)
- Climate: temperature, humidity, absolute humidity (AH), pressure
UI and integration
- Smooth LVGL UI with night mode, custom themes, and status indicators
- Integrated web dashboard at
/dashboard: live state, charts, events, settings sync, DAC page, OTA firmware update - Easy setup: Wi-Fi AP onboarding + mDNS access (
http://<hostname>.local) - Home Assistant ready: automatic MQTT discovery and ready-to-use dashboard YAML
Hardware
- No soldering required: designed for easy assembly using Grove/QT connectors
- Optional DAC control (GP8403, 0-10V): manual levels/timer plus automatic demand mode from air-quality thresholds
- Hardware autodetect: PCF8523/DS3231 RTC plus BMP58x/BMP3xx/DPS310 pressure
- Robust Safe Boot: automatic rollback to the last-known-good config after crashes


 Dashboard |
 Settings |
 Theme Presets |
 MQTT |
 Date & Time |
 Backlight |
Project Aura serves two web experiences from the device:
- Setup portal (AP mode): opening
/in AP mode shows the captive Wi-Fi setup flow (/wifi). - Full dashboard (
/dashboard): tabs for Sensors, Charts, Events, Settings, and System. - Dedicated DAC page (
/dac): live status, manual controls, auto mode, and auto-threshold config. - OTA from dashboard: upload firmware
.bindirectly via the web UI. - Dashboard assets are served locally in both AP and STA modes (no CDN dependency).
Useful API routes used by the dashboard:
GET /api/stateGET /api/charts?group=core|gases|pm&window=1h|3h|24hGET /api/eventsGET /api/diag(AP setup mode only)POST /api/settingsPOST /api/ota
Project Aura is designed around high-quality components to ensure accuracy. If you are sourcing parts yourself, look for these specific modules for the reference build:
| Component | Part / Model |
|---|---|
| Core Board | Waveshare ESP32-S3-Touch-LCD-4.3 (800x480) |
| Main Sensor | Sensirion SEN66 (via Adafruit breakout) |
| Carbon Monoxide (CO) | DFRobot SEN0466 — Factory Calibrated Electrochemical CO (0-1000 ppm, I2C & UART) (optional) |
| Formaldehyde (HCHO) | Sensirion SFA30 (0-1000 ppb) or SFA40 — both autodetected. SFA40 available as the DFRobot SEN0661 breakout (optional) |
| Optional DFR Gas Slot | One DFRobot electrochemical sensor at a time: SEN0469 NH3, SEN0470 SO2, SEN0471 NO2, SEN0467 H2S, or SEN0472 O3. Set the module's I2C address to 0x75 per the DFRobot wiki (optional) |
| Pressure | Adafruit BMP580 or DPS310. Firmware autodetects BMP580/581, BMP585, BMP388, BMP390, and DPS310 (recommended) |
| RTC | Adafruit PCF8523. Firmware autodetects PCF8523 and DS3231; a manual RTC override is also available (recommended) |
| DAC Output | DFRobot GP8403 2-Channel I2C DAC (0-10V), DFR0971 — VOUT0 used (optional) |
Notes
- SEN66 VOC/NOx require about 5 minutes of warmup for reliable readings; the UI shows WARMUP during this period.
- If the CO sensor (SEN0466) is not detected at boot, CO is marked unavailable and the rest of the telemetry stays active.
- Aura auto-detects which DFR gas variant is installed on the optional slot and exposes the matching local UI and MQTT/Home Assistant entities.
- Affiliate disclosure: the Waveshare and DFRobot links above are affiliate links and help support Project Aura at no extra cost.
Recommended retailers: Mouser, DigiKey, LCSC, Adafruit, Seeed Studio, Waveshare (core board).
Please pay close attention to the cabling. The pin order on the board is custom and requires modification of standard off-the-shelf cables (pin swapping).
Backers: please refer to the comprehensive Build Guide included in your reward for the exact wiring diagram and a trouble-free assembly.
DIY: verify pinouts against the pin table below before powering on to avoid damaging components.
| Component | Pin (ESP32-S3) | Notes |
|---|---|---|
| 3V3 | 3V3 | Power for external I2C sensors |
| GND | GND | Common ground |
| I2C SDA | GPIO 8 | Shared bus for all sensors and the DAC (see BOM) |
| I2C SCL | GPIO 9 | Shared bus |
Display and touch are integrated on the board; no external wiring is needed for them.
For DAC control, analog output is generated on the GP8403 module (VOUT0), not on a direct ESP32 pin.
Project Aura speaks your language. You can switch languages in the Settings menu:
- English
- Deutsch
- Espanol
- Francais
- Italiano
- Portugues BR
- Nederlands
- Simplified Chinese
Data flow and responsibilities are intentionally split into small managers:
graph TD
    subgraph Hardware
        Sensors[Sensors<br/>SEN66, SFA30/SFA40, SEN0466, optional DFR gas, BMP58x/BMP3xx/DPS310]
        Touch[Touch<br/>GT911]
        RTC[RTC<br/>PCF8523 or DS3231]
        DAC[DAC<br/>GP8403]
        Actuator[External Fan / Actuator]
        LCD[LCD + Backlight]
    end

    subgraph Core
        SM[SensorManager]
        FC[FanControl]
        NM[NetworkManager]
        MM[MqttManager]
        TM[TimeManager]
        CoreLogic[BootPolicy / Watchdog / MemoryMonitor]
    end

    subgraph Data
        History[PressureHistory]
        Storage[(LittleFS<br/>config/last_good/voc/pressure)]
    end

    subgraph UI
        LVGL[LVGL UI]
        Web[Web Config Portal]
    end

    Sensors -->|I2C| SM
    RTC -->|I2C| TM
    Touch -->|I2C| LVGL
    LCD --> LVGL
    SM -->|Data| LVGL
    SM -->|Data| FC
    SM -->|Data| History
    FC -->|I2C| DAC
    DAC -->|0-10V| Actuator
    History <-->|save/load| Storage
    Storage <-->|config| NM
    Storage <-->|config| MM
    NM --> Web
    NM --> MM
    MM -->|Publish| HA[Home Assistant]

    style CoreLogic fill:#f96,stroke:#333,stroke-width:2px
Core modules live in src/core/ and orchestrate startup (AppInit, BoardInit).
Feature managers are in src/modules/, UI in src/ui/, and web pages in src/web/.
Prerequisites: PlatformIO CLI or VSCode + PlatformIO extension. Built with Arduino ESP32 core 3.1.1 (ESP-IDF 5.3.x).
git clone https://github.com/21cncstudio/project_aura.git
cd project_aura
pio run -e project_aura                  # build firmware
pio run -e project_aura -t upload        # flash firmware
pio run -e project_aura -t uploadfs      # flash LittleFS image (web/UI assets)
pio device monitor -b 115200             # serial monitor
Note:
uploadfsis required at least once on a fresh device. Without it the web dashboard and translations will be missing. Re-run it whenever assets indata/change.
- Wi-Fi setup:
On first boot, the device creates a hotspot:
Aura-XXXXXX-AP(fallback:ProjectAura-Setup). Connect to it and open http://192.168.4.1 to configure Wi-Fi credentials. - Web portal:
After saving Wi-Fi, wait about 15 seconds for AP -> STA transition.
Then access the device at
http://<hostname>.local/(default hostname format:aura-XXXXXX, for exampleaura-1a2b3c.local) or by IP. Do not keep usinghttp://192.168.4.1after STA connection; that address is AP-setup only. In STA mode,/opens the dashboard. In AP mode,/opens setup and/dashboardopens the offline dashboard. - Home Assistant:
MQTT discovery is enabled by default. The device appears in HA via MQTT integration automatically.
A ready-to-use dashboard YAML is available at
docs/home_assistant/dashboard.yaml. Setup guide:docs/home_assistant/README.md.
Optional compile-time defaults belong in include/secrets.h, which is ignored by git.
Copy and edit (Windows / Unix):
copy include\secrets.h.example include\secrets.h    # Windows
cp    include/secrets.h.example include/secrets.h    # macOS / Linux
- State topic:
<base>/state - Availability topic:
<base>/status - Commands:
<base>/command/*(night_mode, alert_blink, backlight, restart) - Home Assistant discovery:
homeassistant/*/config - Discovery payload includes dedicated sensors for
CO(co),PM0.5(pm05), and the optional DFR gas slot (nh3,so2,no2,h2s,o3, plus generic optional gas state/type sensors as applicable).
MQTT stays idle until configured and enabled.

- AP setup mode (
http://192.168.4.1) is local-only and works without internet. - STA mode dashboard (
http://<hostname>.local/dashboardorhttp://<ip>/dashboard) requires the client and Aura to be in the same L2/L3 network path. - If mDNS (
.local) is blocked on your network, use the direct IP from the device screen or router DHCP table. - Avoid guest networks, client isolation, or VLAN rules that block peer-to-peer LAN traffic.
- Required local traffic:
- HTTP: TCP
80to Aura - mDNS: UDP
5353multicast (only for.localhostname discovery)
- HTTP: TCP
- During OTA, keep one active client tab/session to reduce transfer failures.
Quick diagnostics for support:
GET /api/stateshould return live JSON withnetwork.mode,network.ip, and sensor payload.GET /api/diag(available in AP setup mode) shows Wi-Fi state, IP/hostname, heap, OTA busy state, and recent warnings/errors.
Contributions are welcome! Please read CONTRIBUTING.md for details on the process for submitting pull requests and the Contributor License Agreement (CLA).
Found a bug? Open an Issue: https://github.com/21cncstudio/project_aura/issues Have a question? Ask in Discussions: https://github.com/21cncstudio/project_aura/discussions
- Firmware in this repository is licensed under GPL-3.0-or-later (see
LICENSE). - Commercial use is allowed under GPL. If you distribute firmware (including in devices), you must provide the Corresponding Source under GPL.
- If you need to sell devices while keeping firmware modifications proprietary, obtain a Commercial License (see
COMMERCIAL_LICENSE_SUMMARY.md). - Enclosure models and the PDF build guide are not in this repository; they are available to backers on MakerWorld under separate terms.
- Trademark and branding use is covered by
TRADEMARKS.md.
See TESTING.md for native host tests and scripts/run_tests.ps1.
src/core/boot, init, reliabilitysrc/modules/sensors, storage, network, MQTT, timesrc/ui/LVGL screens, assets, controllerssrc/web/HTML templates and handlerstest/native tests and mocks
Parts of this project are developed with AI-assisted workflows. Primary coding assistance is provided by GPT-5 Codex in a local developer workspace.