Branching means you diverge from the main line of development and continue to do work without messing with that main line.
To really understand the way Git does branching, we need to take a step back and examine how Git stores its data.
In the repo you've practiced in the previous tutorial, let's create a directory called test and create 3 files within the directory: test1, test2, test3.
Stage them all and commit.
$ mkdir test && cd test
$ touch test1 test2 test3
$ git add test1 test2 test3
$ git commit -m 'understanding branches'
What really git does when you commit your changes?
First, git creates an object called blob for each file (blobs are actually created during staging).
Then, git creates an object called tree for each directory (in our case, the repo root directory - /, and test directory) and stores a pointer to each blob belonging to the tree.
Git then creates a commit object that has the metadata and a pointer to the tree, so it can re-create that snapshot when needed.
Here is an illustration of our repo assuming only two commits were done.
The first initial commit with 2 committed files - README and myfile.txt, located in the root directory of the repo.
And then the created a new commit, contains 3 more files - test1, test2, test3, located in the test directory:
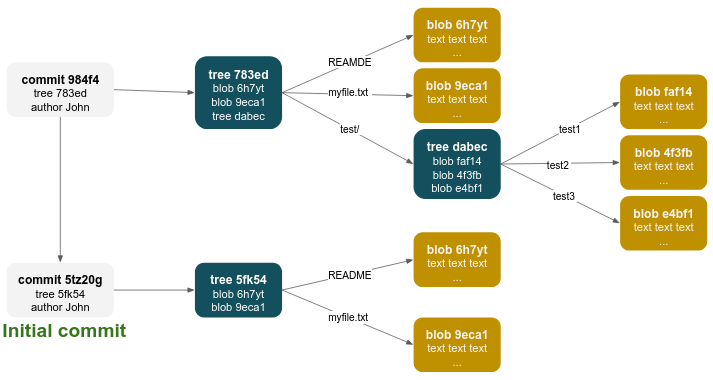
You won't need it for your daily workflow with git, but you can inspect git objects by the git rev-parse and git cat-file commands:
$ git rev-parse HEAD
984f4
$ git cat-file -p HEAD
tree 783ed
parent 5tz20
author Junio C Hamano <gitster@pobox.com> 1507361343 +0900
committer Junio C Hamano <gitster@pobox.com> 1507361343 +0900

understanding branches
$ git cat-file -p 783ed
100644 blob 6h7yt29bb2d1d6434b8b29ae775ad8c2e48c5391	README
100644 blob 9eca129bb2d1d6434b8b29ae775ad8c2e48c5391	myfile.txt
040000 tree dabec60e688ae43df28beea0f49055e605cfc0ba	test
$ git cat-file -p dabec
100644 blob faf149e6799e9289eb2979033c5fe5d314706096	test1
100644 blob 4f3fb285b9db41007f3656718c06abc7b945aa16	test2
100644 blob e4bf129bb2d1d6434b8b29ae775ad8c2e48c5391	test3
If you make some changes and commit again, the next commit stores a pointer to the commit that came immediately before it.
So what the hell is branch?
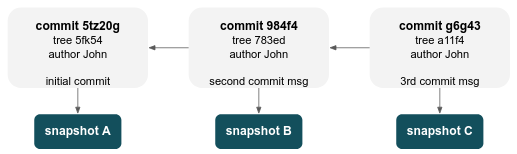
A branch in Git is simply a lightweight movable pointer to one of these commits.
The default branch name in Git is master (or main if the repo was initially created in GitHub).
As you start making commits, you're given a main branch that points to the last commit you made.
Every time you commit, the main branch pointer moves forward automatically.
We will use a nice visualization tool, git-sim to visualize the git graph of your own repo.
-
Since this tool is written in Python, we would like to create a virtual env in your repo, by:
python3 -m venv venv
Note:
python -m venv venvalso can work, depending on the default python version in your system. -
Make sure the
venv/folder is in your.gitignore. -
Activate the venv by:
source venv/bin/activate. Note: you need to activate the venv whenever you start a new terminal session. -
In the
git-simofficial docs, follow the Quickstart section to install the tool. -
To visualize your current git tree, type:
git-sim log
You can create a new branch using the git branch command:
git branch testingWhat happens when you create a new branch? Well, doing so creates a new pointer for you to move around.
How does Git know what branch you're currently on? It keeps a special pointer called HEAD. HEAD is a pointer to the local branch you're currently on.
To switch to an existing branch, you run the git checkout command.
git checkout testingTip
You can create the branch and check it out as well at the same command:
git checkout -b testingLet's do another commit and visualize the git graph by git-sim log -n 50 --all.
Your testing branch has moved forward, but your main branch still points to the commit you were on when you ran git checkout to switch branches. Let's switch back to the main branch:
git checkout mainThat command did two things. It moved the HEAD pointer back to point to the main branch, and it reverted the files in your working directory back to the snapshot that main points to.
Let's make a few changes (on branch main) and commit again. Visualize.
You are highly encouraged to use the git-sim log -n 50 --all command to understand what's going on in your git graph.
- Checkout branch main:
git checkout main. - Let's create a new branch which represents some feature we are going to work on:
git checkout -b myfeature1. - Create some file and commit the changes.
- Let's say you now want to work on another new bug. To do so, you need to switch back to
main, and checkout a new branch calledbugfix(we are always starting from an updated version ofmain, since this is the branch that reflects production). - Commit some changes in
bugfix. - Visualize your git graph with
git-sim log -n 50 --all.
Now we want to merge bugfix into main.
Merging branches basically combines the changes from one branch into another.
In order to merge one branch into another, you need to checkout the branch that you want to merge into.
- Since we want to merge
bugfixintomain:git checkout main. - Then merge by:
git merge bugfix. This command mergesbugfixintomain.
Upon successful merging, you'll notice the phrase fast-forward in that merge. When you try to merge between branches that their commits are connected in a "simple line", git simplifies things by moving the pointer of the branch that you merged into forward - this is called a "fast-forward."
- Make sure that changes from branch
bugfixhave been merged intomain. - Now let's switch back to our
myfeature1branch and commit some new changes there.
It's worth noting here that the work you did in your bugfix branch is not contained in the files in your myfeature1 branch, since that point you've branched out from main was not contained bugfix's changes.
- You've decided that your
myfeature1work is complete and ready to be merged into yourmainbranch. Mergemyfeature1intomain. - Visualize your git graph.
You'll notice that this merge looks a bit different than the bugfix merge you did earlier.
Because the commit on the branch you're on (main) isn't a direct ancestor of the branch you're merging in (myfeature1), Git has to do some work.
In this case, Git does a simple three-way merge, using the two snapshots pointed to by the branch tips and the common ancestor of the two.
Instead of just moving the branch pointer forward, Git creates a new snapshot that results from this three-way merge and automatically creates a new commit that points to it, called a merge commit.
- Now that your work is merged in, you have no further need for the
myfeature1branch, delete it by:git branch -d myfeature1.
Let's summarize your work:
A fast-forward merge occurs when the target branch has not diverged since the source branch was created, resulting in a linear history with no additional merge commit.
A 3-way merge, on the other hand, happens when the source and target branches have diverged, and Git automatically combines the changes from both branches, creating a new merge commit to reconcile the differences.
Occasionally, this process of merging doesn't go smoothly. If you changed the same part of the same file differently in the two branches you're merging, Git won't be able to merge them cleanly.
Let's simulate this scenario.
- Checkout branch
main. - Create the following commits structure, as detailed below:
- In branch
maincreate a file calledfile1and commit it. - Check out a new branch called
dev. In that branch create a file calledfile2with the below content and commit it:Apple Banana Orange - Checkout branch
main, create a file calledfile2too, with the below content and commit it:Apple Pear Orange - This why the two commits are conflicted.
- Create
file3and commit it.
- In branch
- Now merge
mainintodev!
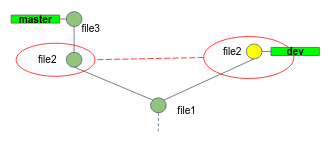
Git hasn't automatically created a new merge commit.
It has paused the process while ask you to resolve the conflict.
If you want to see which files are unmerged at any point after a merge conflict, you can run git status.
Git stages all unconflicted files, while moves conflicted files to the working tree:
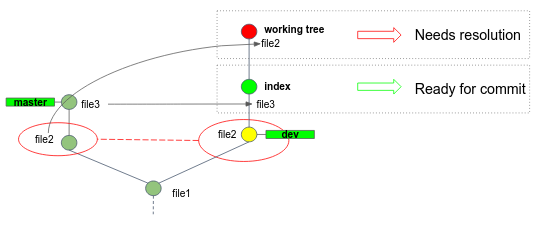
Git adds standard conflict-resolution markers to the files that have conflicts, so you can open them manually and resolve those conflicts.
Your file2 contains a section that looks something like this:
<<<<<<< HEAD:file2
Banana
=======
Pear
>>>>>>> main:file2
In order to resolve the conflict, you have to either choose one side or the other or merge the contents yourself.
- After you've chosen the correct version, run
git add. Staging the file marks it as resolved in Git. - Commit the change.
In Git, there are two main ways to integrate changes from one branch into another: the merge and the rebase.
In this section you'll learn what rebasing is, how to do it, and in what cases you won't want to use it.
If you go back to an earlier example, you can see that you diverged your work and made commits on two different branches.
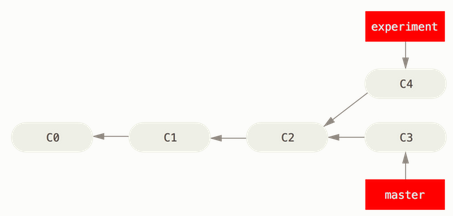
The easiest way to integrate the branches, as we’ve already covered, is the merge command.
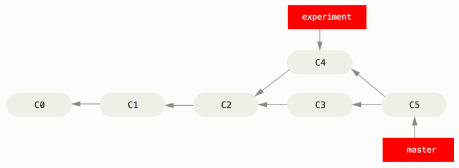
It performs a three-way merge between the two latest branch snapshots (C3 and C4) and the most recent common ancestor of the two (C2), creating a new snapshot (and commit).
However, there is another way: you can take the patch of the change that was introduced in C4 and reapply it on top of C3.
In Git, this is called rebasing. With the rebase command, you can take all the changes that were committed on one branch and replay them on a different branch.
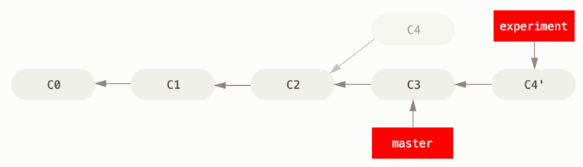
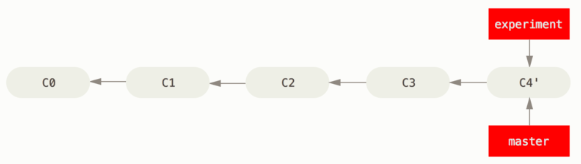
At this point, you can go back to the main branch and do a fast-forward merge.
- From main branch, create a feature branch called
experiment, commit 1 change inexperiment, as well as 1 change inmain, as describe in the first figure above. - Checkout branch
experimentand rebase it intomainby:git rebase main. - Checkout branch
mainand fast-forward mergeexperimentintomain.
There is no difference in the end product of the integration, but rebasing makes for a cleaner history. But, rebase can destroy other's work and mess your repo. Never rebase work of others!
A very common issue for Git beginners is switching branches while there are uncommitted changes in the working tree. We will now simulate this scenario and discuss common practices.
Execute the following commands in your local repo:
git checkout -b co_test
echo "a" >> take.txt
echo "b" >> take.txt
echo "c" >> take.txt
git add take.txt && git commit -m "add take.txt in co_test"
git checkout main
Let's get started:
- In branch
main, create a new file calledtake.txt, write some lines in it and add it to the index (don't commit yet). - Checkout to
co_test, which error do you get? What are the two approaches suggested by git? Read aboutgit stashcommand from the Official Git Docs. - Open your project using Pycharm, try to checkout
co_testagain using the Pycharm UI. On the prompted dialog click Force Checkout. - Does
take.txtcontain your changes when you're now inco_test? - Checkout back to the branch you've come from, do you have your
take.txtthere? So what does Force Checkout do?
Before you checkout a branch, note that if your working directory or staging area has uncommitted changes that conflict with the branch you're checking out, Git won't let you switch branches. It's best to have a clean working state when you switch branches.