Important
This tutorial should be done as part of the Networking project. If you haven't started the project yet - jump in, diving into the world where packets fly and secrets whisper!
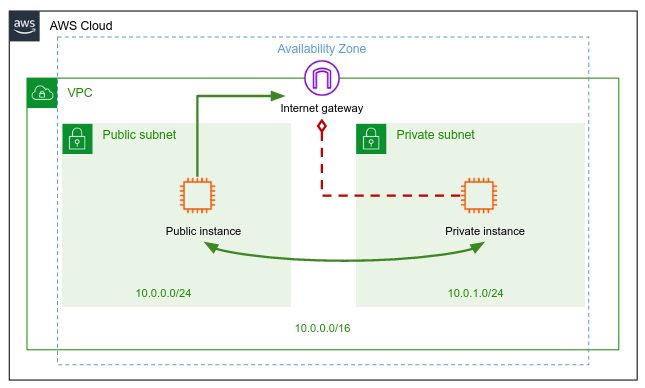
AWS VPC (Virtual Private Cloud) is a service that allows users to create a logically isolated virtual network within the AWS cloud infrastructure. Users can define their own IP address range, subnets, and network gateways, and configure security rules to control access to their resources.
Important
Creating the VPC itself does not incur any cost. You'll be charged only when launching a virtual machines within your VPC.
-
Open the Amazon VPC console at https://console.aws.amazon.com/vpc/.
-
In the navigation pane, choose Your VPCs, Create VPC.
-
Under Resources to create, choose VPC only.
-
Specify the following VPC details.
- Name tag: Provide a name for your VPC, e.g.
<my-alias>-vpc(change<my-alias>to your alias). - IPv4 CIDR block: Specify an IPv4 CIDR block of
10.0.0.0/16for your VPC. The CIDR block size must have a size between /16 and /28. More information can be found in RFC 1918. - Tenancy: Choose the
defaulttenancy option for this VPC.
- Name tag: Provide a name for your VPC, e.g.
-
Choose Create VPC.
Great! Enter the main page of your VPC and explore the details. Especially, note the DHCP option set, the main route table, and the network ACL that AWS was allocated for your VPC.
DHCP option set
No any good reason to touch it, AWS done all for you!
Network ACL
A network access control list (ACL) is an optional layer of security for your VPC that acts as a firewall for controlling traffic in and out of one or more subnets.
Main route table
The main route table contains a single rule that allows traffic to flow freely within the VPC, but does not allow traffic to flow in or out of the VPC. The main route table is applied by default to all subnets in the VPC that are not explicitly associated with a different route table. Thus, by default, machines that will be part of the VPC would not be able to access the public internet, unless otherwise defined.
To add a new subnet to your VPC, you must specify an IPv4 CIDR block for the subnet from the range of your VPC. You can specify the Availability Zone in which you want the subnet to reside.
-
In the navigation pane, choose Subnets.
-
Choose Create subnet.
-
For VPC ID: Choose the VPC for the subnet.
-
For Subnet name, enter a name for your subnet:
<my-alias>-public-subnet. -
For Availability Zone, you can choose a Zone for your subnet, or leave the default No Preference to let AWS choose one for you.
-
For IPv4 CIDR block, enter an IPv4 CIDR block for your subnet:
10.0.0.0/24. -
Choose Create subnet.
To allow traffic to flow out of the VPC (to the public internet), a new custom route table needs to be created and associated with the above created subnet.
We will turn now to create the custom route table that would allow traffic flow to the public internet.
-
In the navigation pane, choose Route Tables.
-
Choose Create route table.
-
For Name, enter a name for your route table. E.g.
<my-alias>-public-rt. -
For VPC, choose your VPC.
-
Choose Create.
In a real, physical network, the way computers are able to connect to the internet is by a device called a router. But since we are building virtual network, the way of AWS to provide us a "router", is by a resource called Internet Gateway. We can say that Internet Gateway serves as a virtual router to connect your VPC to the internet.
You'll now create an internet gateway and attach it to your VPC.
-
In the navigation pane, choose Internet Gateways, and then choose Create internet gateway.
-
Name your internet gateway, e.g.
<my-alias>-igw. -
Choose Create internet gateway.
-
Select the internet gateway that you just created, and then choose Actions, Attach to VPC.
-
Select your VPC from the list, and then choose Attach internet gateway.
When you create a subnet, AWS automatically associate it with the main route table for the VPC. By default, the main route table doesn't contain a route to an internet gateway. The following procedure uses your custom route table and creates a route that sends traffic destined outside the VPC to the internet gateway, and then associates it with your subnet.
-
Select the custom route table that you just created. The details pane displays tabs for working with its routes, associations, and route propagation.
-
On the Routes tab, choose Edit routes, Add route, and add the following routes as necessary. Choose Save changes when you're done.
- For IPv4 traffic, specify
0.0.0.0/0in the Destination box, and select the internet gateway ID in the Target list.
- For IPv4 traffic, specify
-
On the Subnet associations tab, choose Edit subnet associations, select the check box for the subnet, and then choose Save associations.
Each subnet has an attribute that determines whether machines launched into that subnet are assigned a public IP address by default. Your created subnet has this attribute set to false. We would like to enable this property, so we would be able to connect to machines in this subnet from our local machine.
-
In the navigation pane, choose Subnets.
-
Select the public subnet that you just created, and then choose Actions, Edit subnet settings.
-
For Auto-assign IP settings, check the Enable auto-assign public IPv4 address box.
-
Choose Save.
Amazon EC2 (Elastic Compute Cloud) is a web service that provides resizable compute capacity in the cloud. It allows users to create and manage virtual machines, commonly referred to as "instances", which can be launched in a matter of minutes and configured with custom hardware, network settings, and operating systems.

-
Open the Amazon EC2 console at https://console.aws.amazon.com/ec2/.
-
From the EC2 console dashboard, in the Launch instance box, choose Launch instance, and then choose Launch instance from the options that appear.
-
Under Name and tags, for Name, enter a descriptive name for your instance.
-
Under Application and OS Images (Amazon Machine Image), do the following:
- Choose Quick Start, and then choose Ubuntu. This is the operating system (OS) for your instance.
-
Under Instance type, from the Instance type list, you can select the hardware configuration for your instance. Choose the
t2.nanoinstance type (the cheapest one). In Regions wheret2.nanois unavailable, you can use at3.nanoinstance. -
Under Key pair (login), choose create new key pair the key pair that you created when getting set up.
-
For Name, enter a descriptive name for the key pair. Amazon EC2 associates the public key with the name that you specify as the key name.
-
For Key pair type, choose either RSA.
-
For Private key file format, choose the format in which to save the private key. Since we will use
sshto connect to the machine, choose pem. -
Choose Create key pair.
Important
This step should be done once! once you've created a key-pair, use it for every EC2 instance you are launching.-
The private key file is automatically downloaded by your browser. The base file name is the name you specified as the name of your key pair, and the file name extension is determined by the file format you chose. Save the private key file in a safe place.
Important
This is the only chance for you to save the private key file. -
Your private key file has to have permission of
400,chmodit if needed.
-
-
Next to Network settings, choose Edit.
- From VPC choose your VPC.
- From Subnet choose your public subnet.
-
Keep the default selections for the other configuration settings for your instance.
-
Review a summary of your instance configuration in the Summary panel, and when you're ready, choose Launch instance.
-
A confirmation page lets you know that your instance is launching. Choose View all instances to close the confirmation page and return to the console.
-
On the Instances screen, you can view the status of the launch. It takes a short time for an instance to launch. When you launch an instance, its initial state is
pending. After the instance starts, its state changes torunningand it receives a public DNS name. -
It can take a few minutes for the instance to be ready for you to connect to it. Check that your instance has passed its status checks; you can view this information in the Status check column.
Note
When stopping the instance, please note that the public IP address may change, while the private IP address remains unchanged
Can be done in pairs.
A VPC peering connection is a networking connection between two VPCs that enables you to route traffic between them privately. Resources in peered VPCs can communicate with each other as if they are within the same network. You can create a VPC peering connection between your own VPCs, with a VPC in another AWS account, or with a VPC in a different AWS Region. Traffic between peered VPCs never traverses the public internet.

Follow AWS documentation on VPC peering (https://docs.aws.amazon.com/vpc/latest/peering/what-is-vpc-peering.html) to create a simulated networking scenario.